
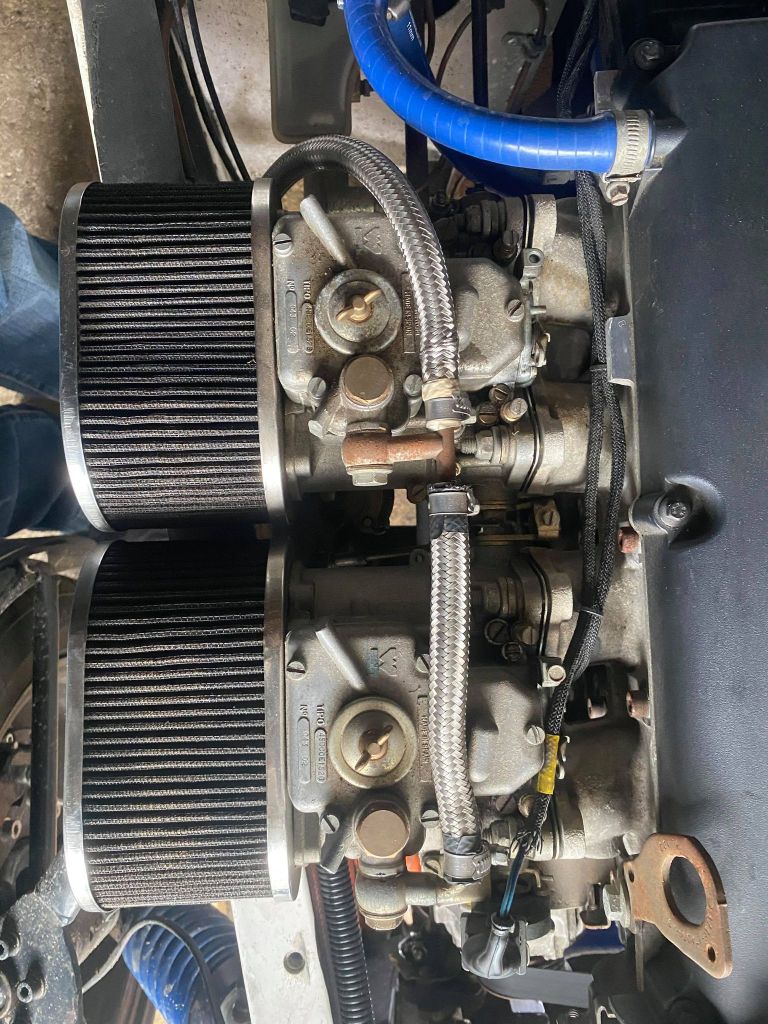
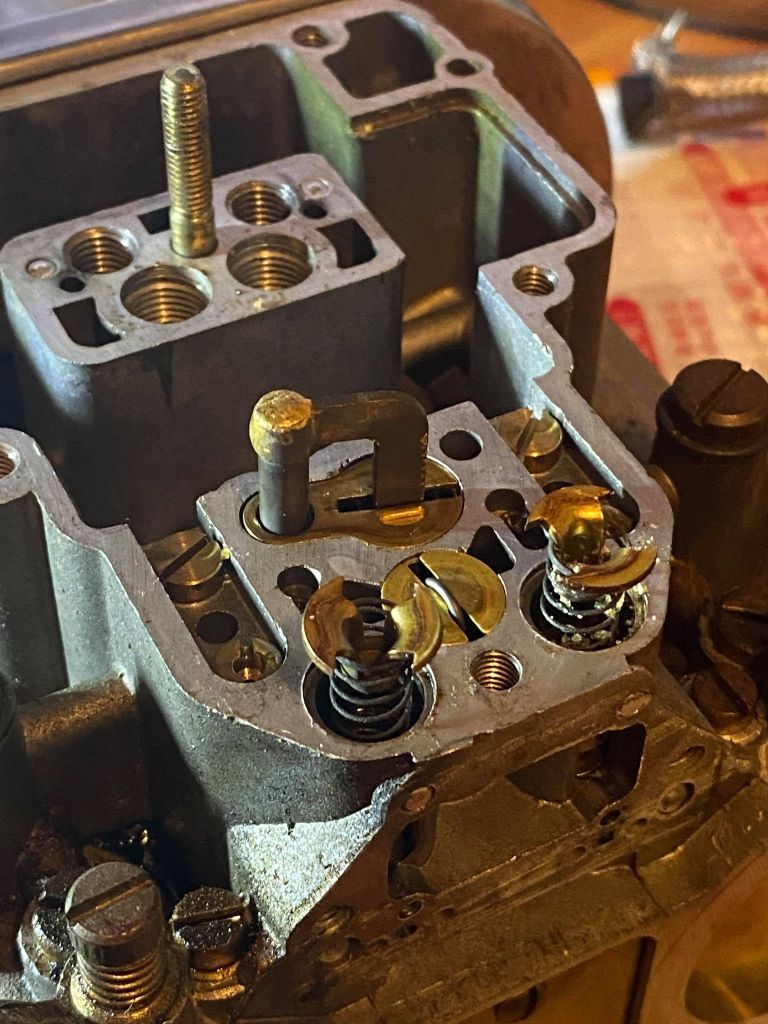
22/11/2020: In my last post I mentioned that I had to retire the car from the Brookland Autosolo because of a fuel flow issue. I bit the bullet and started the fuel system strip and clean today. I spent a happy couple of hours at the garage taking the carbs off the car and then another few at home starting to strip them.
My first observation is that I think I have found the culprit causing the fuel flow issues. Inside the carbs is gross! There is a gel like substance mixed in with grit. The fuel filter was missing from one of the carbs and this can’t have helped.
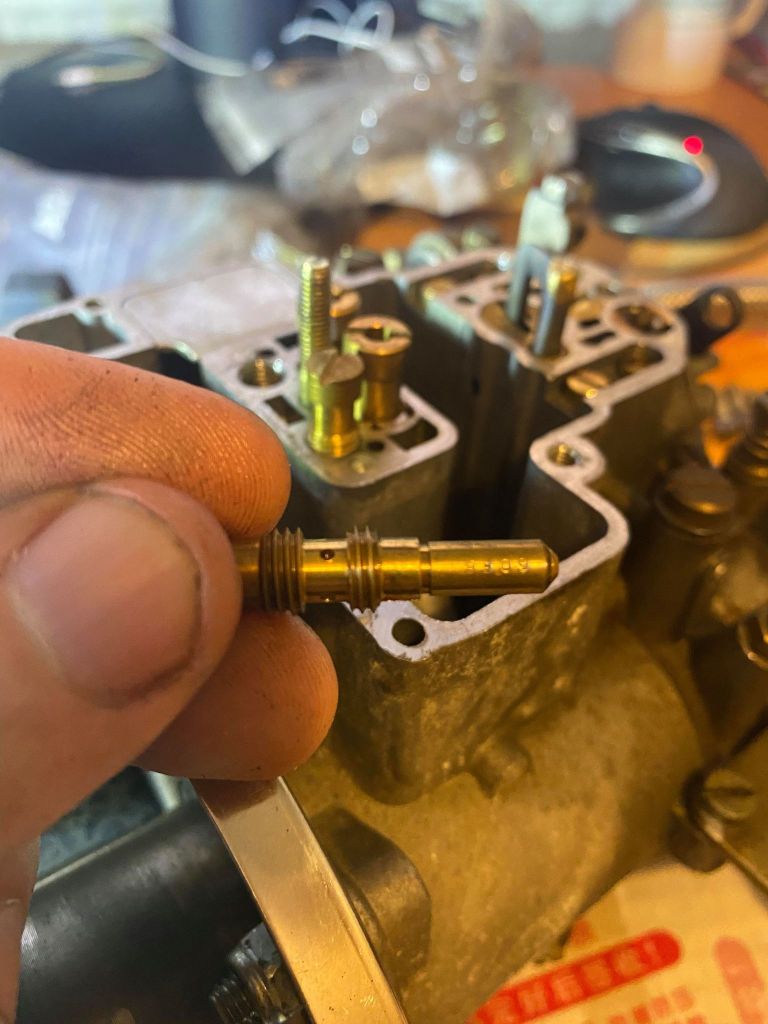
Here is a before and after of taking the carbs off:
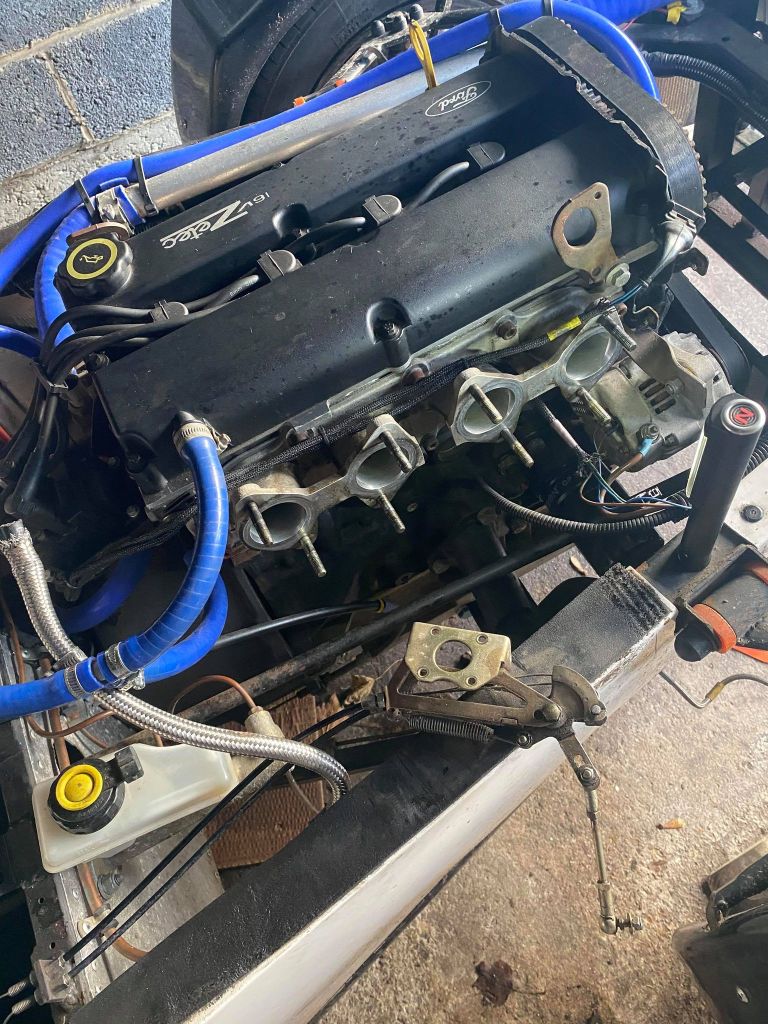
Not too much work, just four nuts for each carb and then some fiddling with the throttle linkages. I can’t wait to tidy these up a bit and, with the carbs removed, I can now get to the rest of the engine bay to give it a detail!
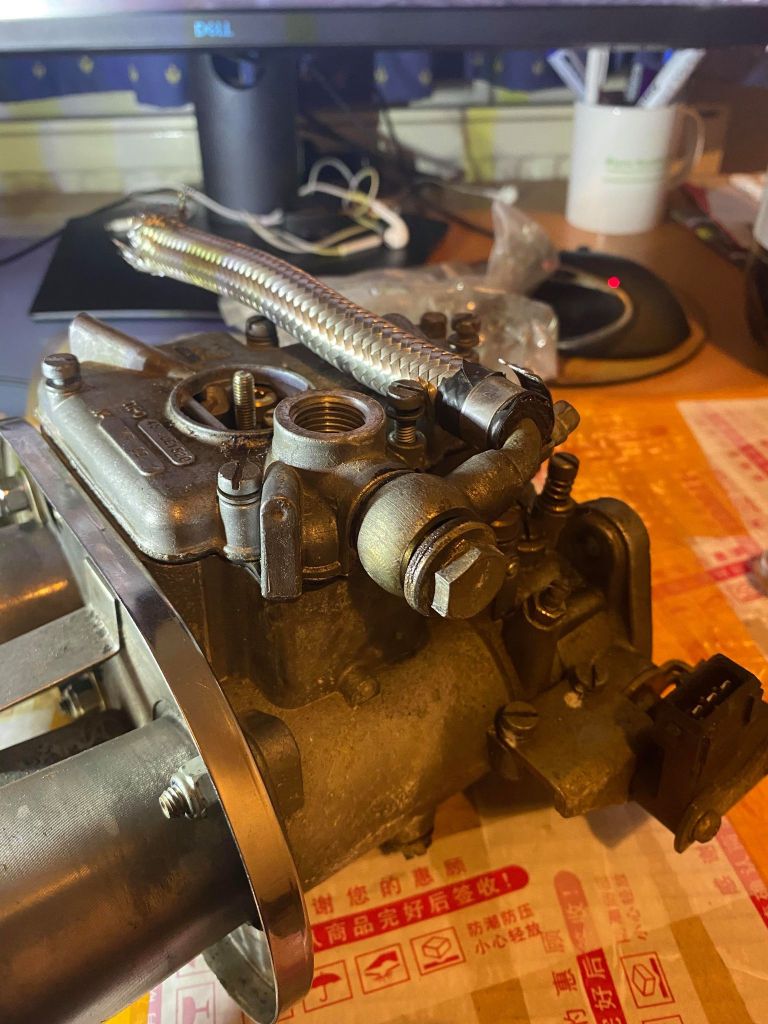
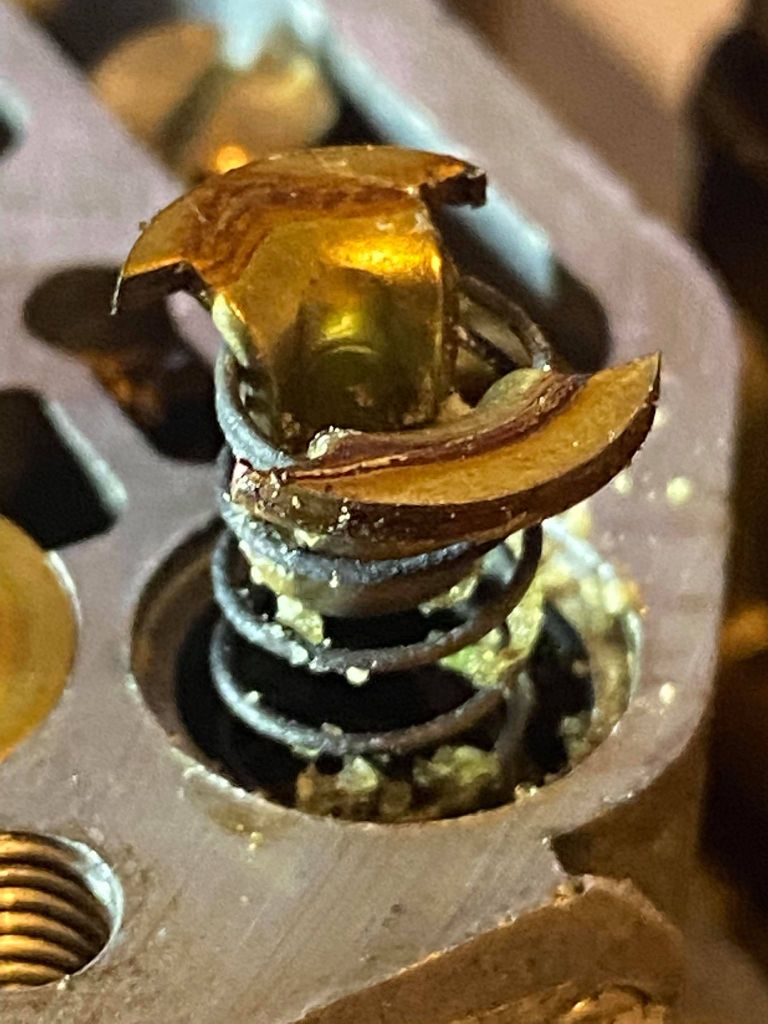
When I got them home a very brief inspection indicated that I was along the right lines in suspecting blocked up jets:


Now, this gel is sat in the choke jets. As far as I am aware my setup doesn’t use these. Nevertheless, if this stuff is here then it will be elsewhere too.
I don’t think the car was used heavily by the previous owners. With a carb setup I understand that there is the risk that if you fill the reservoirs with fuel and then let the evaporate over and over then residue can build up. I suspect that is what has happened here. My heavy right foot, coupled with the autosolo competitions, has created enough vibration to shake all this loose and for it start to cause a problem.
The strip is going well enough but I need a fine punch to release the throttle spring leaver. It’s quite late now so I’m going to take a break and pick it back up during the week.
Here’s a few more pictures of the disassembly:
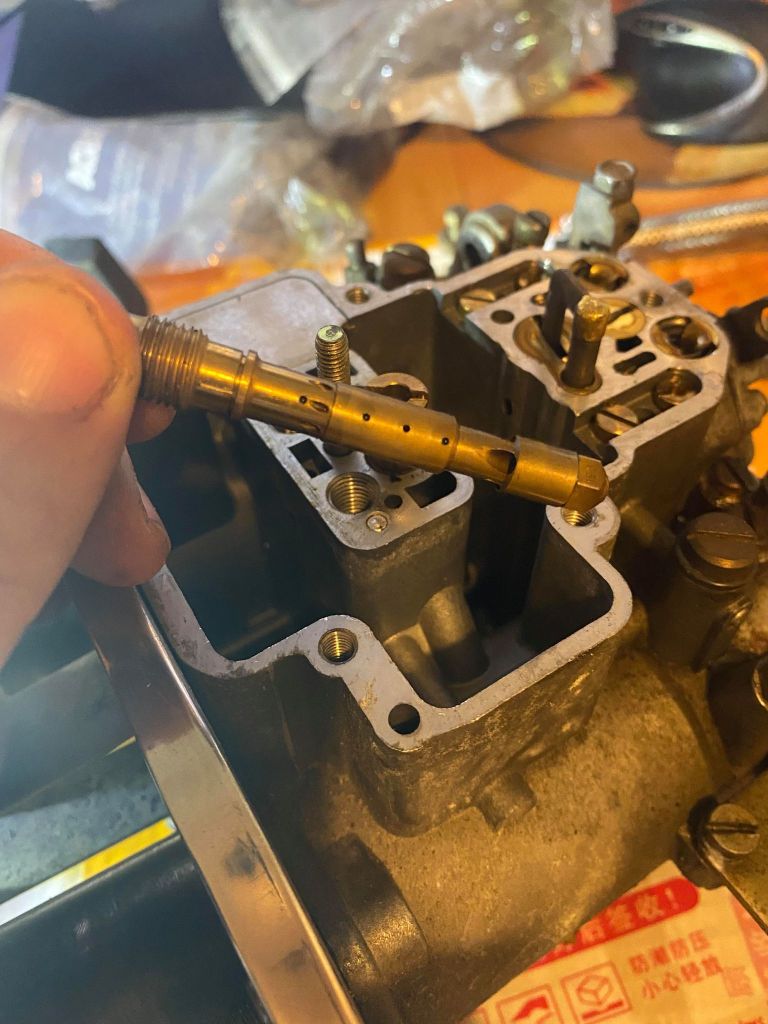


The last picture really shows how gunked up they are! I’m surprised the car even moved!
In case anyone stumbles across this blog looking for advice, don’t listen to me! However, this bloke really seems to know what he is talking about:
I’ve found his step-by-step instructions really easy to follow (he does one on assembly too!). I must admit, watching this towards the end I’m a little nervous about trying to get the spindle out!
Lastly, my carbs are really grimy on the outside. I’m thinking of getting them vapour blasted. I spotted a Facebook advert a few weeks back for Roy’s Vapour Blasting, which I think is a new service near where I live. I dropped Roy a message via his webpage and received a response in less than two hours… excellent customer service! If finances over Christmas allow then I will have the carbs done.
I need to source a service kit and I’ll probably get replacement bearings whilst I’m at it. I also need to find some braided fuel hose that is rated to deal with the new higher ethanol content in modern fuels.
Right, that’s enough for now. I’ll post an update to this page when I have some progress to report.
27/12/2020: So things have been progressing well with the clean out. I couldn’t find a punch small enough to knock out the pin so I made one. I took a jewellry screwdriver and ground the end off and then slowly reduced the diameter with the Dremmel held in a vice. Hardly a bench grinder but it did the job!
I also bought a 3L ultra sonic clearer and some Aluminium cleaner. It also did a good job of removing the grime:

Overall I was pleased with the way in which everything came out:

Whilst stripping this carb I found that the bearings were really worn so I’ve replaced them with new. I’ve reassembled (without gaskets) this carb to keep everything together whilst I strip the second. The second came apart pretty easily too. However, this was the way that the spindle was ‘secured’ on one end:
I’m not sure this is recommended! I’ve ordered replacement nuts along with spindle screws. The final bit of spending went on some Samco Profuel silicone hose to replace the braided line I took off.
I’m deciding if I should fork out on some DIY shot blasting equipment as it would be nice to rejuvenate the outside of the carbs. T
02/01/2021: So all the parts have arrived including a new length of Samco Profuel Silicone fuel line (£55 including delivery for 1m… it better be good stuff!). Both carbs have been fully stripped, cleaned and I have test assembled one of the carbs without gaskets or thread lock on the butterfly screws. It all seems to be working fine:
Of course, the real test will be when it has fuel in, feeding the engine.
Unfortunately the decision as to whether to buy some shot blasting gear was taken out of my hands as, typical of the year 2020, my daily car was vandalised with someone smashing the windscreen, snapping off the two near side door handles and scouring some of the other windows.
I cheered myself up a bit by cleaning up some of the other bits of the fuel system that looked messy. Not going for a highly polished look (I use the car too much for that) but don’t want rust either!!

I get an immense sense of satisfaction from small improvements like this 🙂
The next post should be about my attempts to fully reassemble and reattach the the carbs and then tune them… not looking forward to that as it seems a little complicated!! That’s not to mention the throttle linkages, I think I should have taken more pictures when removing the carbs from the car!
28/01/2021: Okay, so not for the first time pride comes before a fall!
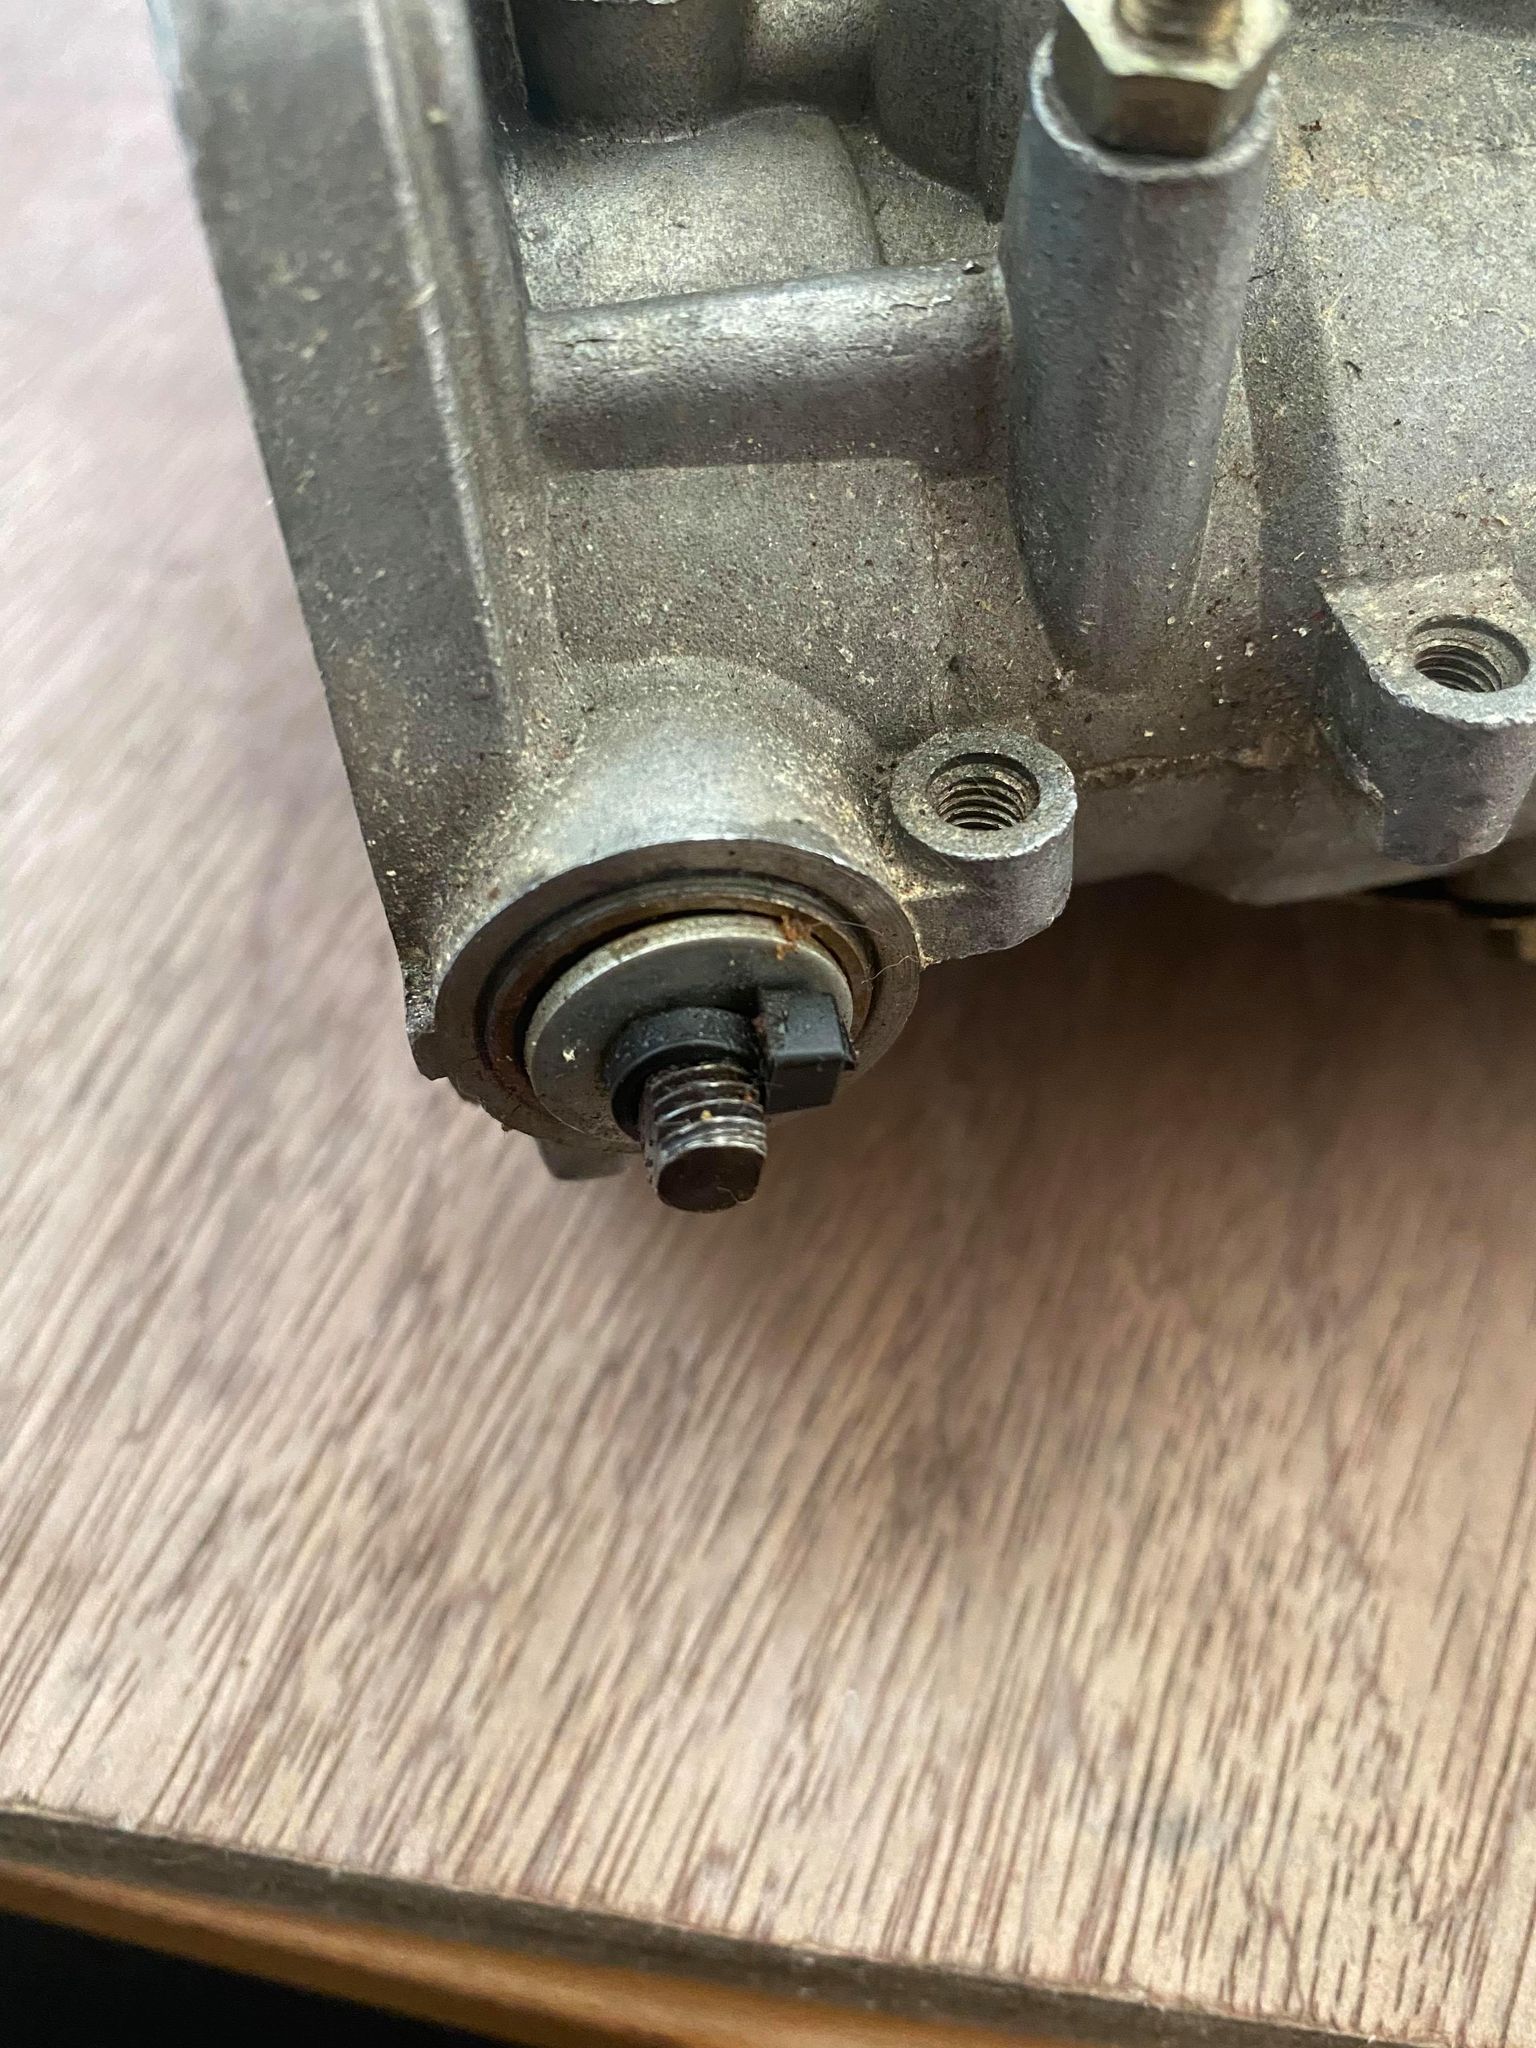
Things were going so well with the carb refurb and then I made a series of really silly and compounding mistakes. When one carb was fully assembled (the one in the video above) I was working on the second reassemble. Without realising it, I put the spindle in 180 degrees out from how it should have been installed. Then when attaching the fuel pump actuating cam, which requires knocking a split pin through the cam and spindle, this jammed.
Rather that take a breath, reflect and make a sensible decision, I departed on an a course of action which has turned out costly. The split pin jammed with about 3mm protruding (I’m not surprised now as I don’t think it would have every gone through with the orientation of the spindle incorrect). This was fouling on the inspection cover plate and prevented reassemble the carb. At this point, I didn’t think the issue with the orientation of the spindle was any big deal as I couldn’t visualise how it was causing the carb to not function properly. So, rather than be sensible, I ground off the excess split pin so it was flush with the collar of the actuating cam allowing me to close the inspection plate and finish the reassemble.
Turns out this was a silly thing to do. With the spindle 180 degree out, the arm of the actuating cam was not lifting the fuel pump high enough for it to work properly. I noticed the difference in the height of the fuel pump when I had the two reassembled carbs side-by-side. The job of this pump is to literally spray fuel each time the accelerator pedal is pressed, this helps the engine get going and create the Venturi effect to draw in the rest of the fuel. Without the pump working fully there would be less fuel reaching the engine on initial acceleration and I suspect that this would seriously impact performance.
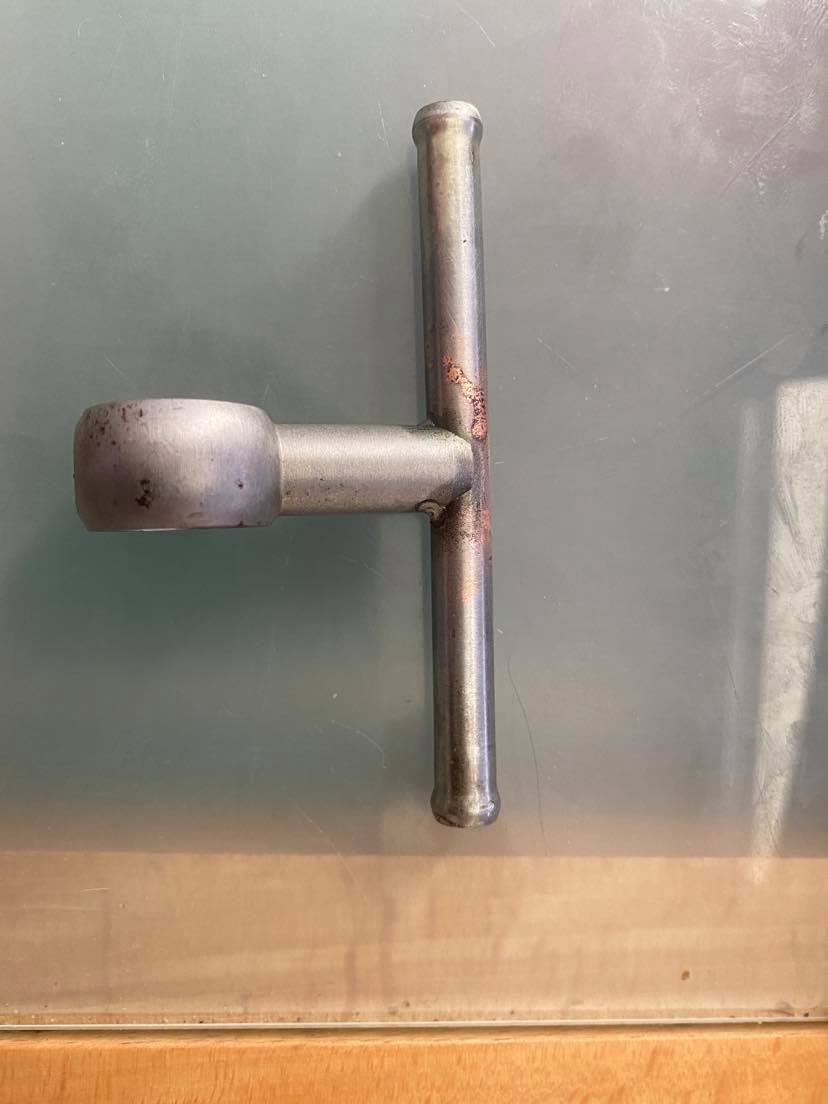
The spindle had to come out again but this can’t happen without the actuating cam coming off and this was firmly attached by a jammed split pin! The solution was always going to be destructive! I tried drilling out the split pin using a cobalt drill bit but that metal was about as tough as any I’ve come across. When this failed, I then tried to cut away at the collar and leave the spindle in tact. This is how well this approach worked:


I’m afraid it didn’t at all! I ended up having to cut all the way through the collar and spindle. Pay day tomorrow and almost £100 of car parts with VAT and delivery (and I suspect an import charge too). Stupid mistake to make, but at least I haven’t done anything to the carb itself. There was always a chance I would slip when cutting… very relieved that didn’t happen!
I suspect it will be a few weeks before the parts arrive. Hopefully I can get everything back together and on the car with a basic tune. I’ve identified a local(ish) garage that can tune Webers using a rolling road. Would be good to get a horsepower number as well. Something to look forward to as this episode hasn’t been my finest!
16/02/2021: Back on track (almost!). When the parts arrived the actuating cam was only drilled on one side. It turns out that you have to drill the back hole yourself. I now own a bench drill stand for my Dremmel along with a range of cobalt bits and cutting oil! Anyway, it’s done the job.
After I fashioned a jig to hold all the bits and pieces together I’ve just drilled the piece and it’s gone well. My battery powered Dremmel only just had enough torque to get through but it did the job. The replacement split pin is a little long and looks like it might need some persuading to work it’s way through the cam and spindle. A job for the upcoming weekend.
28/02/2021: So this is a puzzling one… I’ve fully assembled both carbs. The fuel pump is sat considerably lower on the carb with the new parts.


I’ve compared the fuel pumps and they are identical. The difference in height can only come from the alignment of the cam. So it’s either the shape of the cam arm (they looked the same when offering the parts to each other) or the angle of the cam arm on the spindle.
The spindle came pre-drilled, as did one side of the cam. So the cam with the lower pump is at the stock alignment. I wonder if it’s a trick for those drilling there own spindle to make the fuel pump action more aggressive by drilling at a slight angle?
I suppose it’s possible there is such a thing as a performance cam. Bit of investigation required!
13/03/2021: Turns out my first guess was correct. It was common for the spindles to be drilled at a position not 90 degrees to the butterflies. Not the end of the world because by flipping the spindle it was possible to drill another hole and I don’t think I’ve weakened it any. The challenge was, with my basic setup, how to drill the hole in the correct position.
One very helpful member of my motorclub had an old Weber manual which showed their setup of how to do this. The spindle would be drilled when in the carb, held by the special tool which also allowed you to set the height of the pump:
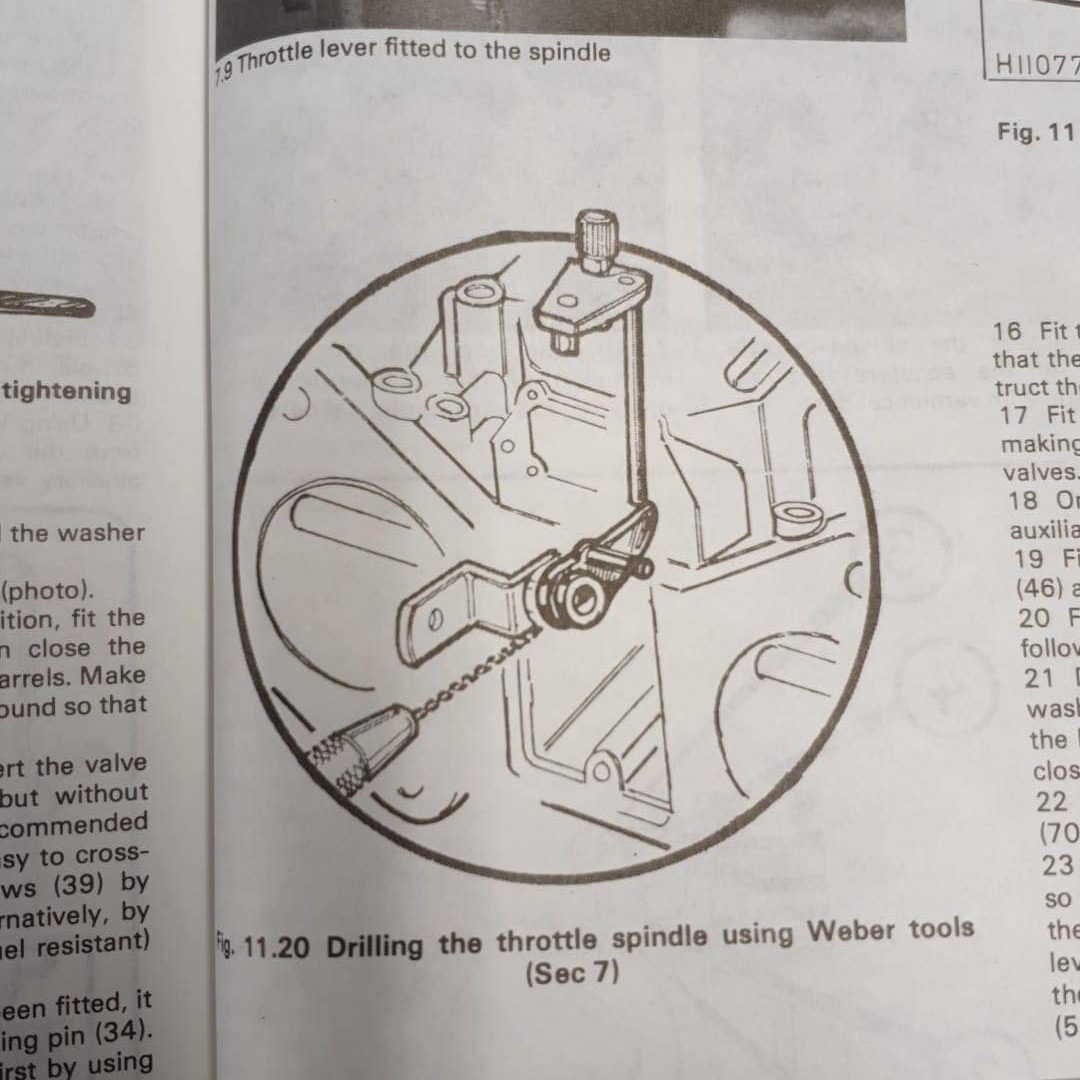
Whilst I didn’t take a picture of my setup, I created a wooden spacer which just perfectly fitted between the pump and the carb body on the carb with the old parts (and modified pump position). I then used this to ensure that the pump in the carb with the spindle I was drilling was an exactly the same height. With a bit of fiddling, and using the cam collar as a guide I drilled 2/3s of the way through the spindle with the spindle in the carb.
With the cutting oil and swarth is was all getting a little difficult to keep in position so I then took out the spindle and drilled the rest of the way through with the spindle in a vice. I’m pleased to say the pin will go through and hold the cam and the pump is as near as I dared to hope the same height as the others!
Work is super busy but I do hope to get these back on the car at some point in the near future!
28/08/2021
I really should keep on top of this stuff! I need to work back and add all my pictures and workprocess. This is job is done and I’ve had the carbs professionally tuned. She’s running great and making 148bp at the wheels!
As soon as I have a few minutes I’ll back fill this page… probably in 2025 🙂
